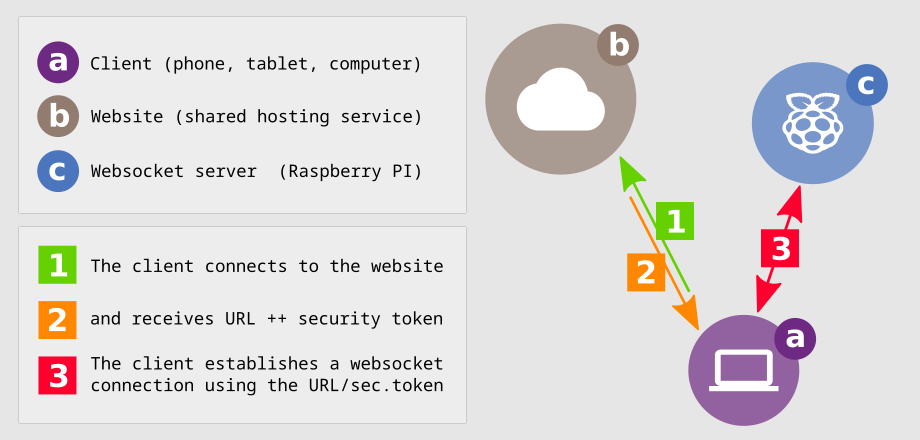
Raspberry Pi as a secure websocket chat server
CAUTION! This guide is for advanced users only! If any of the terms nginx, port forwarding, DNS record, SSL certificate, DHCP server, static IP, systemd sounds foreign and unfamiliar you'd better stop now. It is useless to skip steps unless you know what you are doing.
Requirements
- Full DNS access to a domain name records
- Home router with a static external WAN IP
- Raspberry Pi 1/2/3 with the latest Raspbian Stretch (Lite)
- Website / shared hosting with PHP/MySQL to install Blab! WS (client)
Step 1 Domain/Subdomain
If you do not have a domain name to spare, create a subdomain from the control panel provided by your domain registrar.
In short, if you own mydomain123.com you have to add a new A record chatserver that points to the public (external) IP of your home router so that when you navigate to chatserver.mydomain123.com your browser pings your home router.
The terminology might be slightly different - you'd better Google / Google for details.
Step 2 Raspberry Pi: Static IP (wired)
sudo nano /etc/dhcpcd.conf uncomment and modify the following lines:
interface eth0
static ip_address=192.168.1.5/24
static routers=192.168.1.1
static domain_name_servers=8.8.4.4 8.8.8.8
and reboot.
192.168.1.5 must be outside the range used by the DHCP server of your router.
( nano: save with CTRL+o - confirm with Enter - exit with CTRL+x )
In detail: WiFi · StackExchange · Google
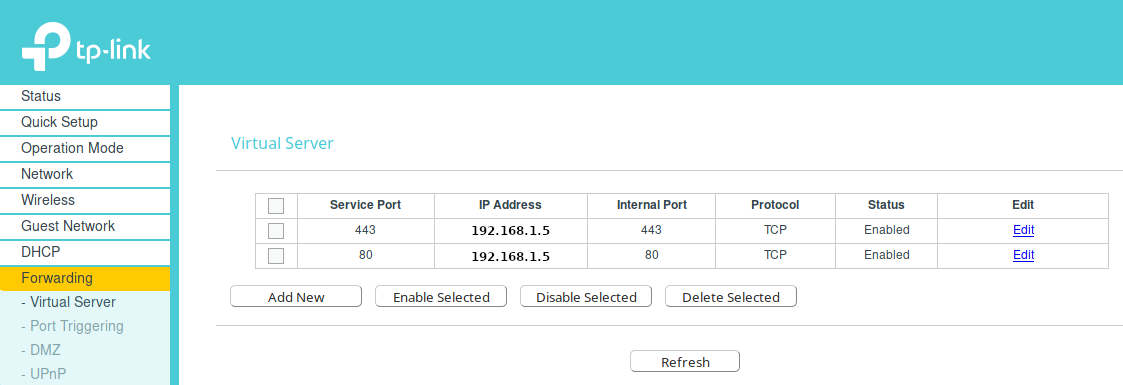
Step 3 Router: Port Forwarding
Using the admin panel of your home router forward ports 80 and 443 to the static IP address of the Raspberry Pi so that when you navigate to chatserver.mydomain123.com or chatserver.mydomain123.com your browser pings your Raspberry Pi (through your home router) on ports 80 and 443 respectively. If there's a conflict with the remote management of the router (TP-Link) you'll have to change the remote management port to something else beforehand (e.g. 12000) and load the remote management with chatserver.mydomain123.com:12000.
Step 4 Raspberry Pi: Nginx & Let'sEncrypt SSL certificate
Install Nginx: sudo apt install nginx. Nginx will be used as a frontend websocket proxy. The default configuration file of Nginx is /etc/nginx/nginx.conf, many other files within this directory are included as well and amongst them /etc/nginx/sites-available/default where the default Nginx virtual server is set.
sudo nano /etc/nginx/sites-available/default and add a new location within the server block:
location /MyWsServer/ {
    proxy_pass http://127.0.0.1:9002;
    proxy_http_version 1.1;
    proxy_set_header Upgrade $http_upgrade;
    proxy_set_header Connection "upgrade";
    proxy_read_timeout 1200s;
}
In the same file replace: server_name _; with server_name chatserver.mydomain123.com;
( nano: save with CTRL+o - confirm with Enter - exit with CTRL+x )
The official method of installing a Let'sEncrypt SSL certificate on Nginx / DebianStretch did not work at the time of writing this due to a missing dependency but you can test it anyway. If it doesn't work remember to sudo apt remove certbot before continuing with this guide: https://certbot.eff.org/lets-encrypt/otherpip-nginx.
Reload Nginx with the following command sudo systemctl reload nginx and check that both chatserver.mydomain123.com and chatserver.mydomain123.com load the start page of Nginx.
Step 5 Raspberry Pi: blabws-server
Download blabws-server {ARM7-32bit - RaspberryPi} from the product page, unzip and upload to your Raspberry Pi so that the full filepath to the service executable file is: /opt/blabws-server/blabws-server. You can put the service file in your home folder first: /home/pi and then move the service file folder and its content with:
sudo mv /home/pi/blabws-server /opt/blabws-server
Step 6 Raspberry Pi: systemd service
Create a systemd service with nano to start your blabws-server on boot.
sudo nano /lib/systemd/system/blabws.service (replace MyAccessKey321 with a random string with letters/digits only):
[Unit]
Description=blabws-service
After=network.target

[Service]
Type=simple
Restart=always
RestartSec=5

ExecStart=/opt/blabws-server/blabws-server MyAccessKey321 9002

[Install]
WantedBy=multi-user.target
( nano: save with CTRL+o - confirm with Enter - exit with CTRL+x )
- Enable the service with:
sudo systemctl enable blabws - Start the service:
sudo systemctl start blabws - Make sure that it works:
sudo systemctl status blabws - Confirm that it listens on port 9002:
telnet 127.0.0.1 9002
Step 7 Website: BlaB! WS (client)
-
Download BlaB! WS (client) from the product page, unzip the content in an empty folder and upload it to your website (shared hosting).
-
CHMOD blabws/config.php to 666, blabws/attachments to 777, navigate with your browser to YOUR_WEBSITE_URL.COM/blabws/index.php and follow the instructions (3 steps only).
-
On the first screen select Remotely Hosted Websocket Service and do not enter anything on Step #1.
-
At the end of the installation process you'll see a link to the Admin CP - go to Websocket, and set:
- protocol: wss
- Server URL: chatserver.mydomain123.com (see step 1)
- Server port: remove 9002 and leave the box empty
- ProxyPass token: MyWsServer (see step 4 - nginx location)
- Accesskey: MyAccessKey321 (see step 6)
Save with OKAY, hit EXIT to go to chat.
Done!